
Staging and photography are two halves of the same whole. What looks good to the naked eye doesn't always translate into a stunning photograph. Key tips include: keep kitchen worktops 90% clear, use symmetry in bedrooms, ensure all lightbulbs match in colour temperature, remove all personal toiletries from bathrooms, and hide bins and vehicles on shoot day. Work closely with your stager and photographer to plan focal points, negative space, and colour palettes together for the best results.
I’ve been a property photographer for over 17 years, and if there’s one thing I’ve learned, it’s this: you can have the most beautifully designed show home, but if it’s not staged with the camera in mind, you’re leaving money on the table. It’s a classic case of what looks good to the naked eye doesn’t always translate into a stunning photograph. I’ve walked into countless show homes that feel fantastic in person, but I can immediately spot the staging elements that will look cluttered, awkward, or just plain wrong through my lens.
That’s why I believe that staging and photography are not two separate processes; they are two halves of the same whole. When you plan them together, you create a powerful marketing tool that sells a lifestyle, not just a property. When they are disconnected, you get photos that feel flat and fail to capture the magic you’ve worked so hard to create. This post is my developer’s checklist to bridging that gap, ensuring your show home is not just staged, but staged for the perfect shot.
01Why Staging and Photography Need to Be Planned Together
Think of your show home as a film set and your photographer as the director. The set designer (your staging company) and the director need to be on the same page, working from the same script. The goal isn’t just to create a beautiful room, but to create a beautiful image of that room. The camera lens is a critical, and often unforgiving, viewer.
It flattens three-dimensional space, exaggerates clutter, and highlights imperfections the casual observer might miss. A cushion arrangement that looks artfully casual in person can look like a messy pile in a photo. A beautifully set dining table can appear so cluttered that it makes the room feel smaller. This is the crucial difference between staging for viewing and staging for photography. By thinking about the final photos from the very beginning of the staging process, you can avoid costly and time-consuming restaging on the day of the shoot.
02Working With Your Staging Company for the Camera
Your relationship with your interior designer or staging company is key. The best ones understand that their work needs to shine on camera. When you’re briefing them, make it clear that photographic-friendliness is a top priority. Encourage a dialogue between your stager and your photographer (me!). I’m always happy to have a quick chat with the stager beforehand to discuss angles, lighting, and potential problem areas. This collaborative approach saves everyone time and results in a much stronger set of final images.
Here are a few things to discuss with your stager:
- Focal Points: Every room needs a hero. Is it the kitchen island? The fireplace? The view from the window? The staging should guide the eye to this focal point, not compete with it.
- Negative Space: In photography, the empty space is just as important as the filled space. Over-staging is a common problem. We need room for the composition to breathe. Less is very often more.
- Colour Palettes: While bold, dramatic colours can be stunning in person, they can be tricky on camera and may not appeal to the broadest range of buyers. A neutral base with carefully chosen colour pops in accessories is often a safer and more effective bet.
03The Room-by-Room Developer's Checklist
Let’s walk through a typical show home, room by room, and look at the key staging elements that make for incredible photographs.
Kitchen
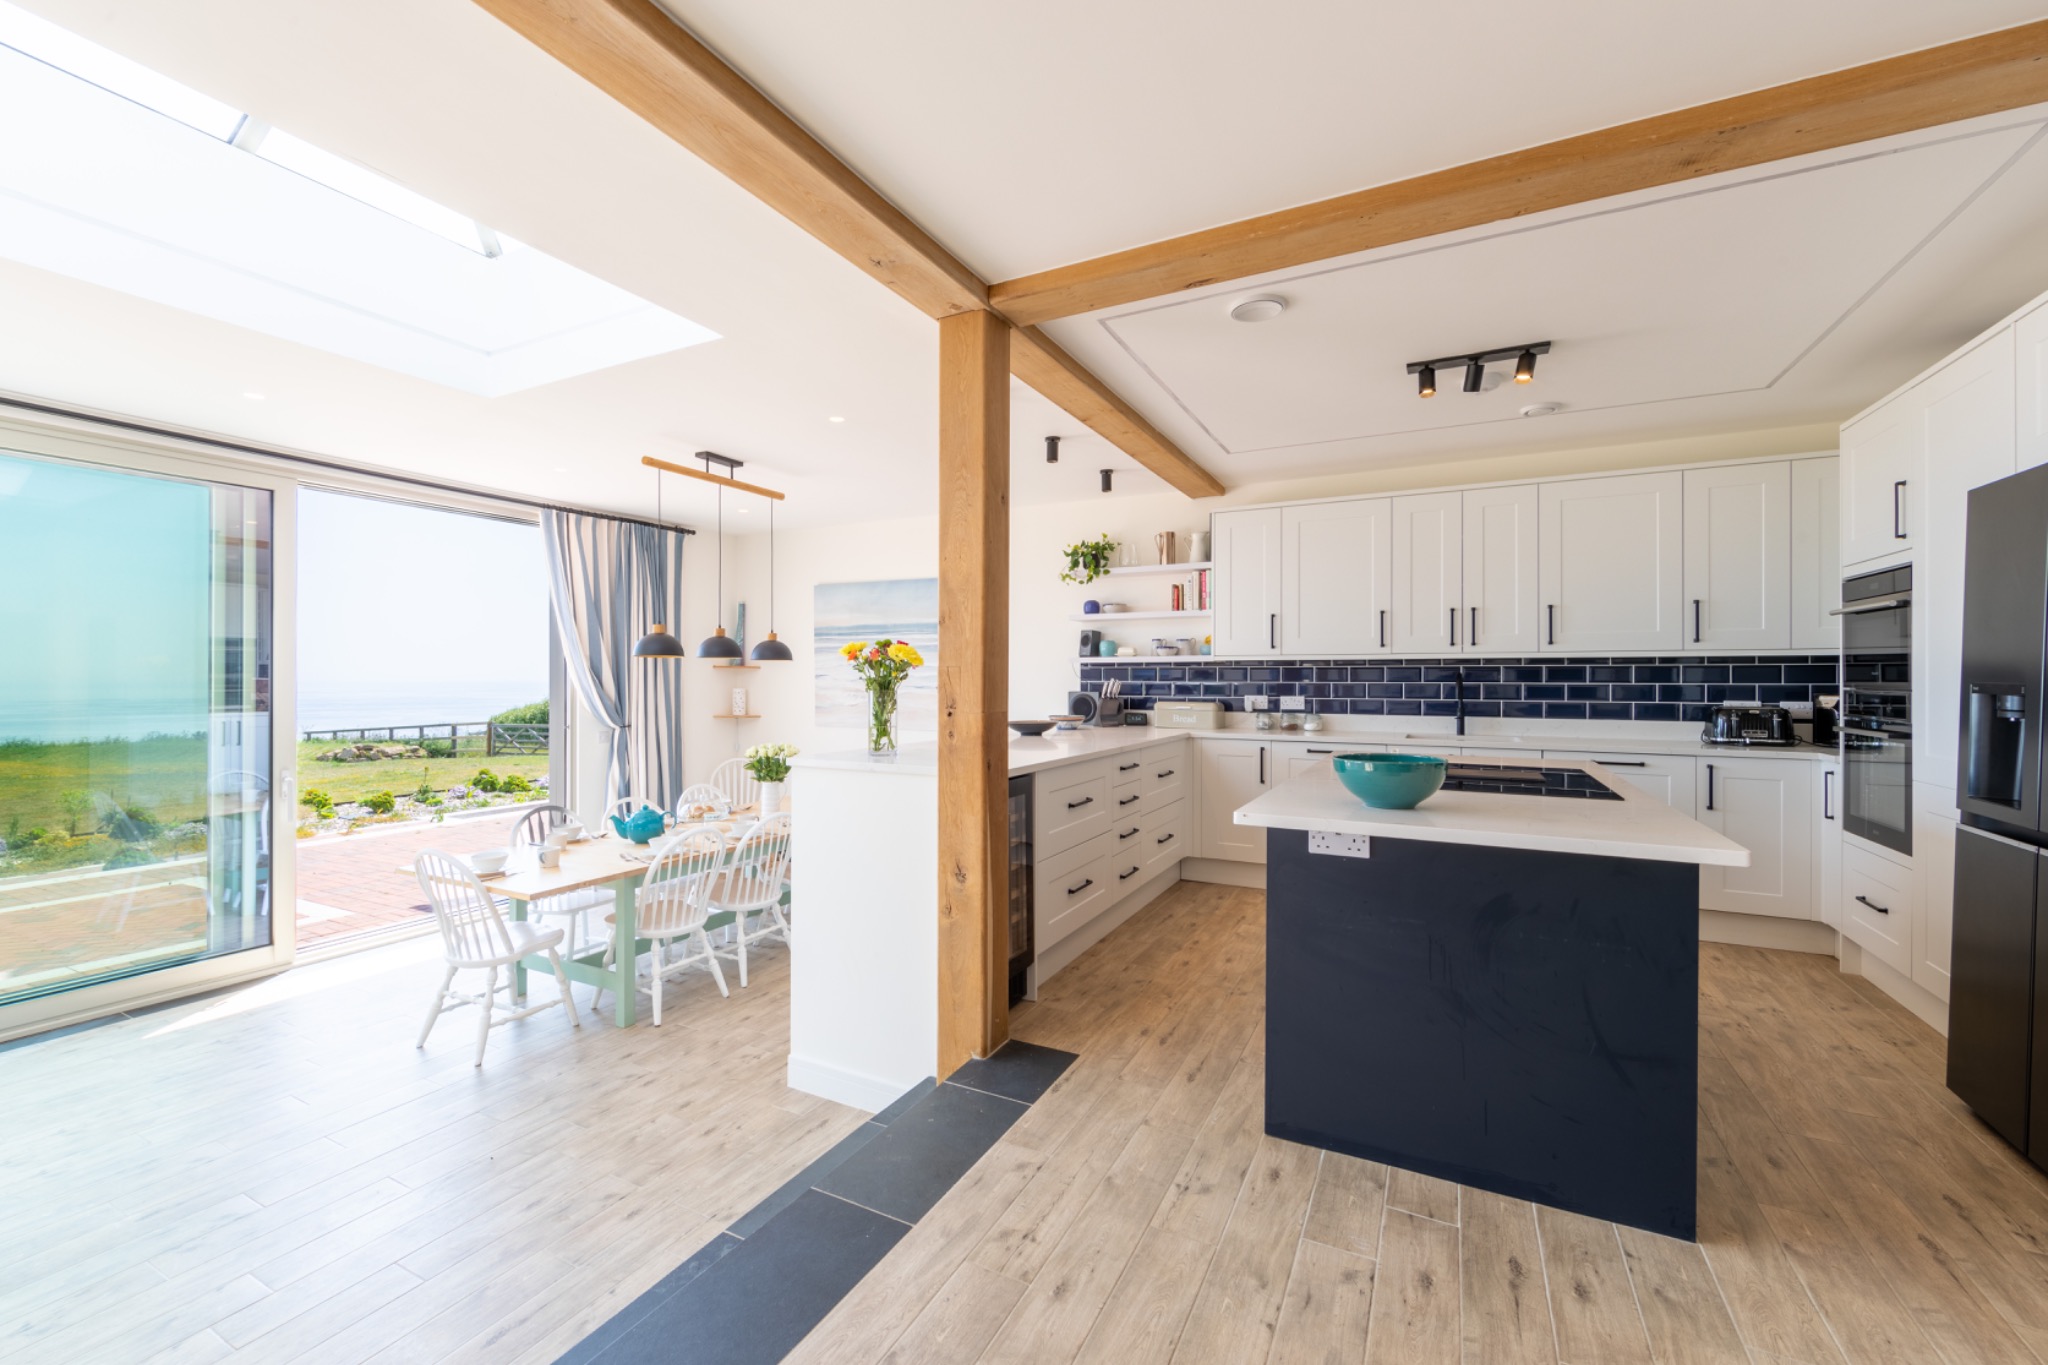
The kitchen is the heart of the home and a major selling point. The goal is to make it look pristine, functional, and aspirational.
- Worktops: Keep them 90% clear. A stylish kettle, a neat stack of cookbooks, a vase of fresh flowers, or a bowl of lemons or green apples can add a touch of life. But that’s it. Remove all other appliances, knife blocks, and general clutter.
- Appliances: Ensure all stainless steel is polished and free of fingerprints. Hobs should be sparkling. The camera is ruthless with smudges.
- Lifestyle Props: A half-poured glass of wine and a cheeseboard can suggest a sociable, relaxing space. A cafetière and a couple of coffee cups on the breakfast bar create a morning routine fantasy. It’s about selling the experience.
Living Room
This is where potential buyers imagine themselves relaxing and entertaining. It needs to feel comfortable, stylish, and spacious.
- Cushion Placement: This is a classic! Cushions should be plumped and arranged deliberately. The ‘karate chop’ look is a bit dated now; a more natural, full look is better. Symmetry often works well, but a slightly asymmetrical arrangement can feel more relaxed.
- Lighting: A mix of lighting is essential. We’ll use the main lights, but table lamps and floor lamps add warmth and depth. Ensure all bulbs are the same colour temperature (warm white is usually best).
- Focal Points: Arrange the furniture to highlight the room’s best feature, whether it’s a fireplace, a media unit, or a beautiful bay window. Don’t just push furniture against the walls; creating conversational groupings makes the space feel more inviting and photographs better.
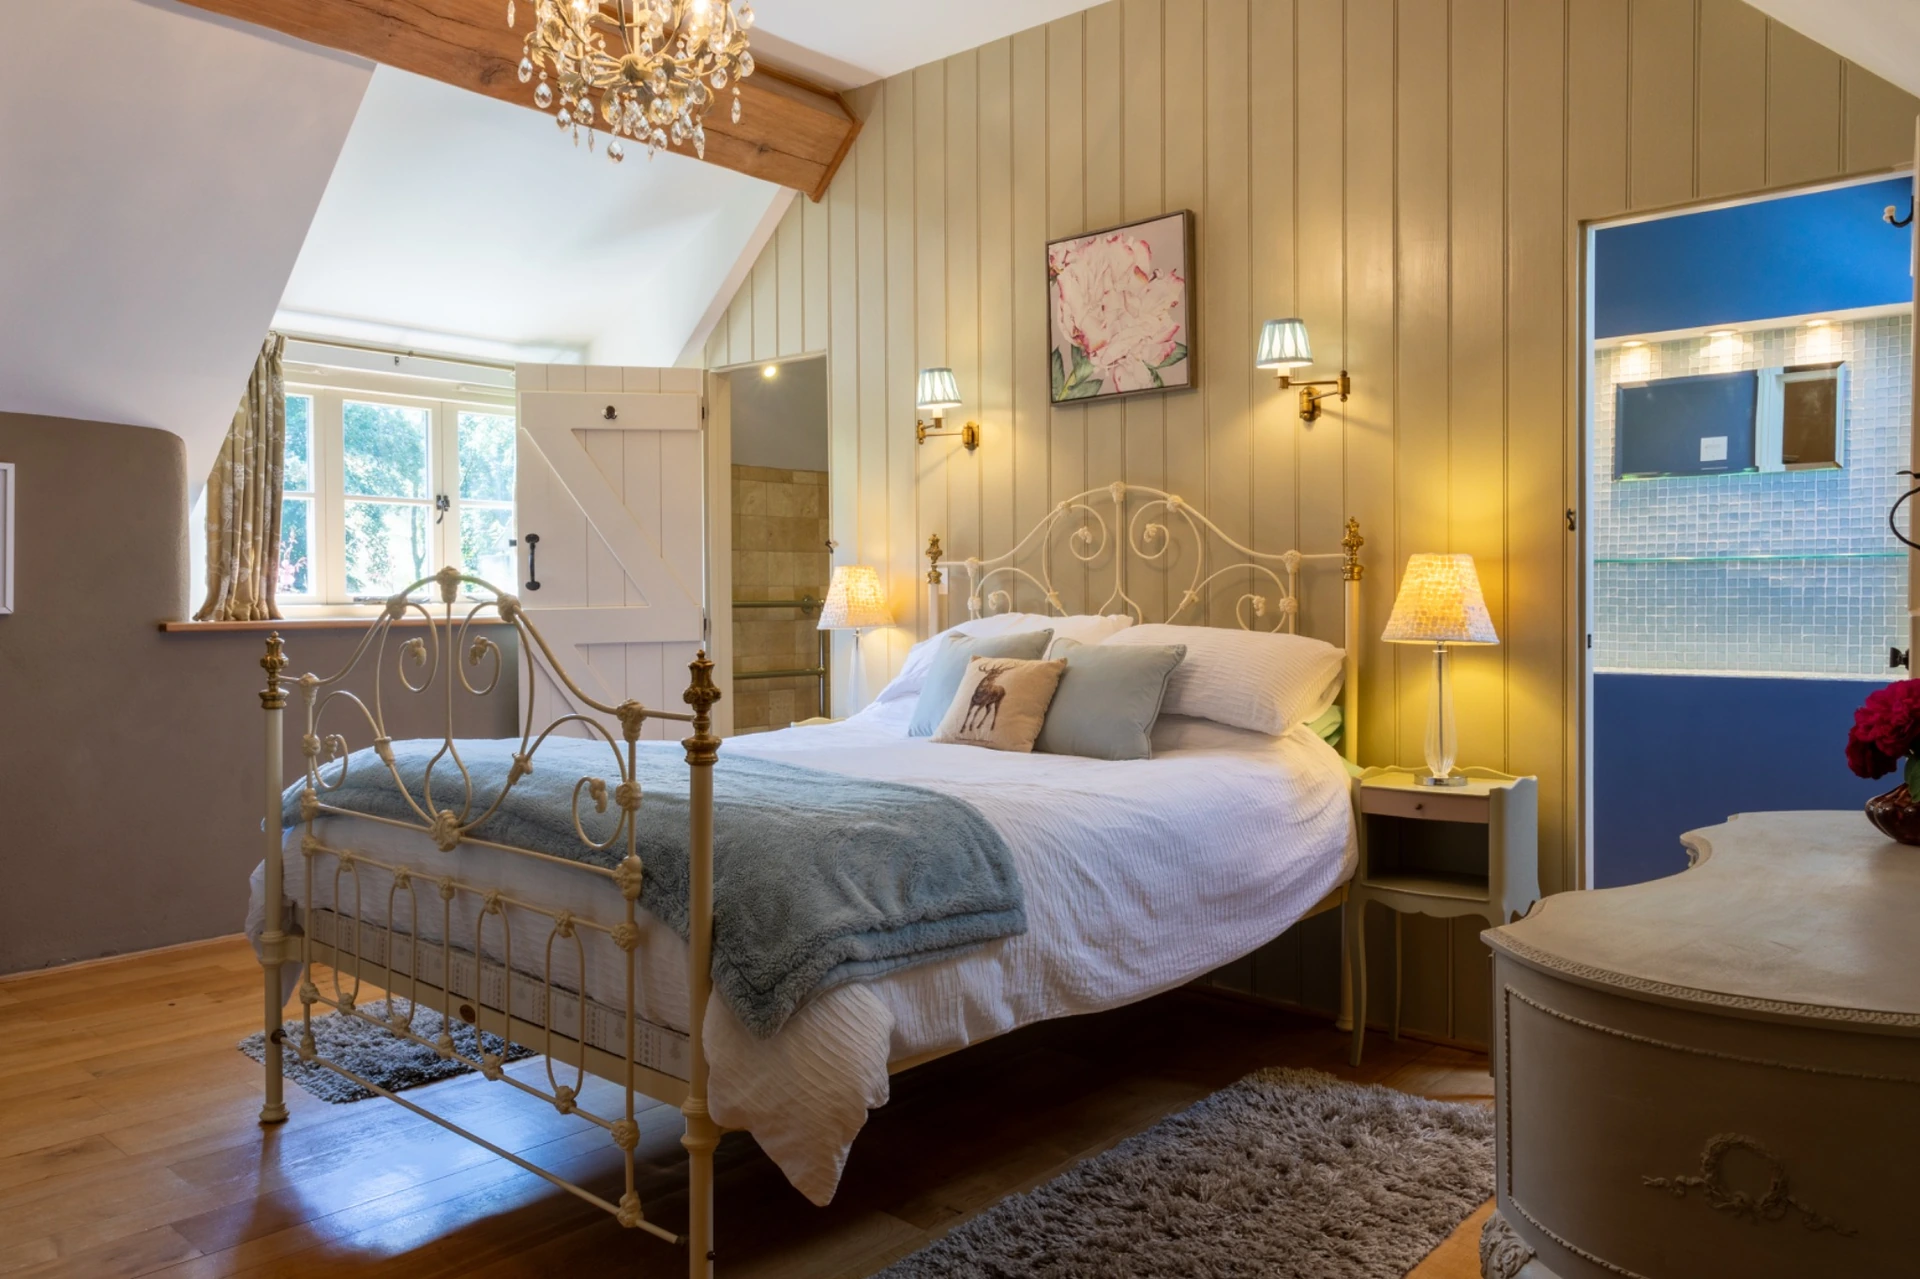
Master Bedroom
The master bedroom should be a sanctuary – a calm, luxurious retreat.
- Bedding: This is non-negotiable. The bed must be made to hotel standards. Use fresh, high-quality, and immaculately ironed bedding. A textured throw and a selection of plump pillows and cushions will add a touch of luxury.
- Symmetry: Symmetry is your friend in the bedroom. Matching bedside tables, lamps, and a balanced arrangement of pillows create a sense of calm and order that is very pleasing to the camera.
- Window Dressing: Ensure curtains or blinds are hanging perfectly. They frame the view and soften the room. They should be clean and crease-free.
Bathroom
Show home bathrooms need to look like a five-star hotel spa: spotless, tidy, and luxurious.
- Towels: Use fresh, fluffy, white towels. Fold them neatly or hang them perfectly on the rail. A neatly rolled stack of hand towels by the sink is a nice touch.
- Accessories: Less is more. A single bottle of expensive-looking hand soap, a small plant (an orchid or succulent works well), and perhaps a high-end candle is all you need. Remove all personal toiletries, toilet brushes, and bathmats.
- Mirrors and Glass: Every single surface must be polished to perfection. Water spots, dust, and fingerprints are incredibly obvious in photos.
Hallway & Entrance
This is the first impression, both in person and in the photos. It sets the tone for the rest of the property.
- A Clear Welcome: The hallway should be clear of clutter. No coats on hooks or piles of shoes. A slim console table with a mirror above it and a simple vase of flowers can create an elegant welcome.
- The View Through: One of my favourite shots is the view from the front door through the hallway into the main living space. Make sure this line of sight is clear and inviting.
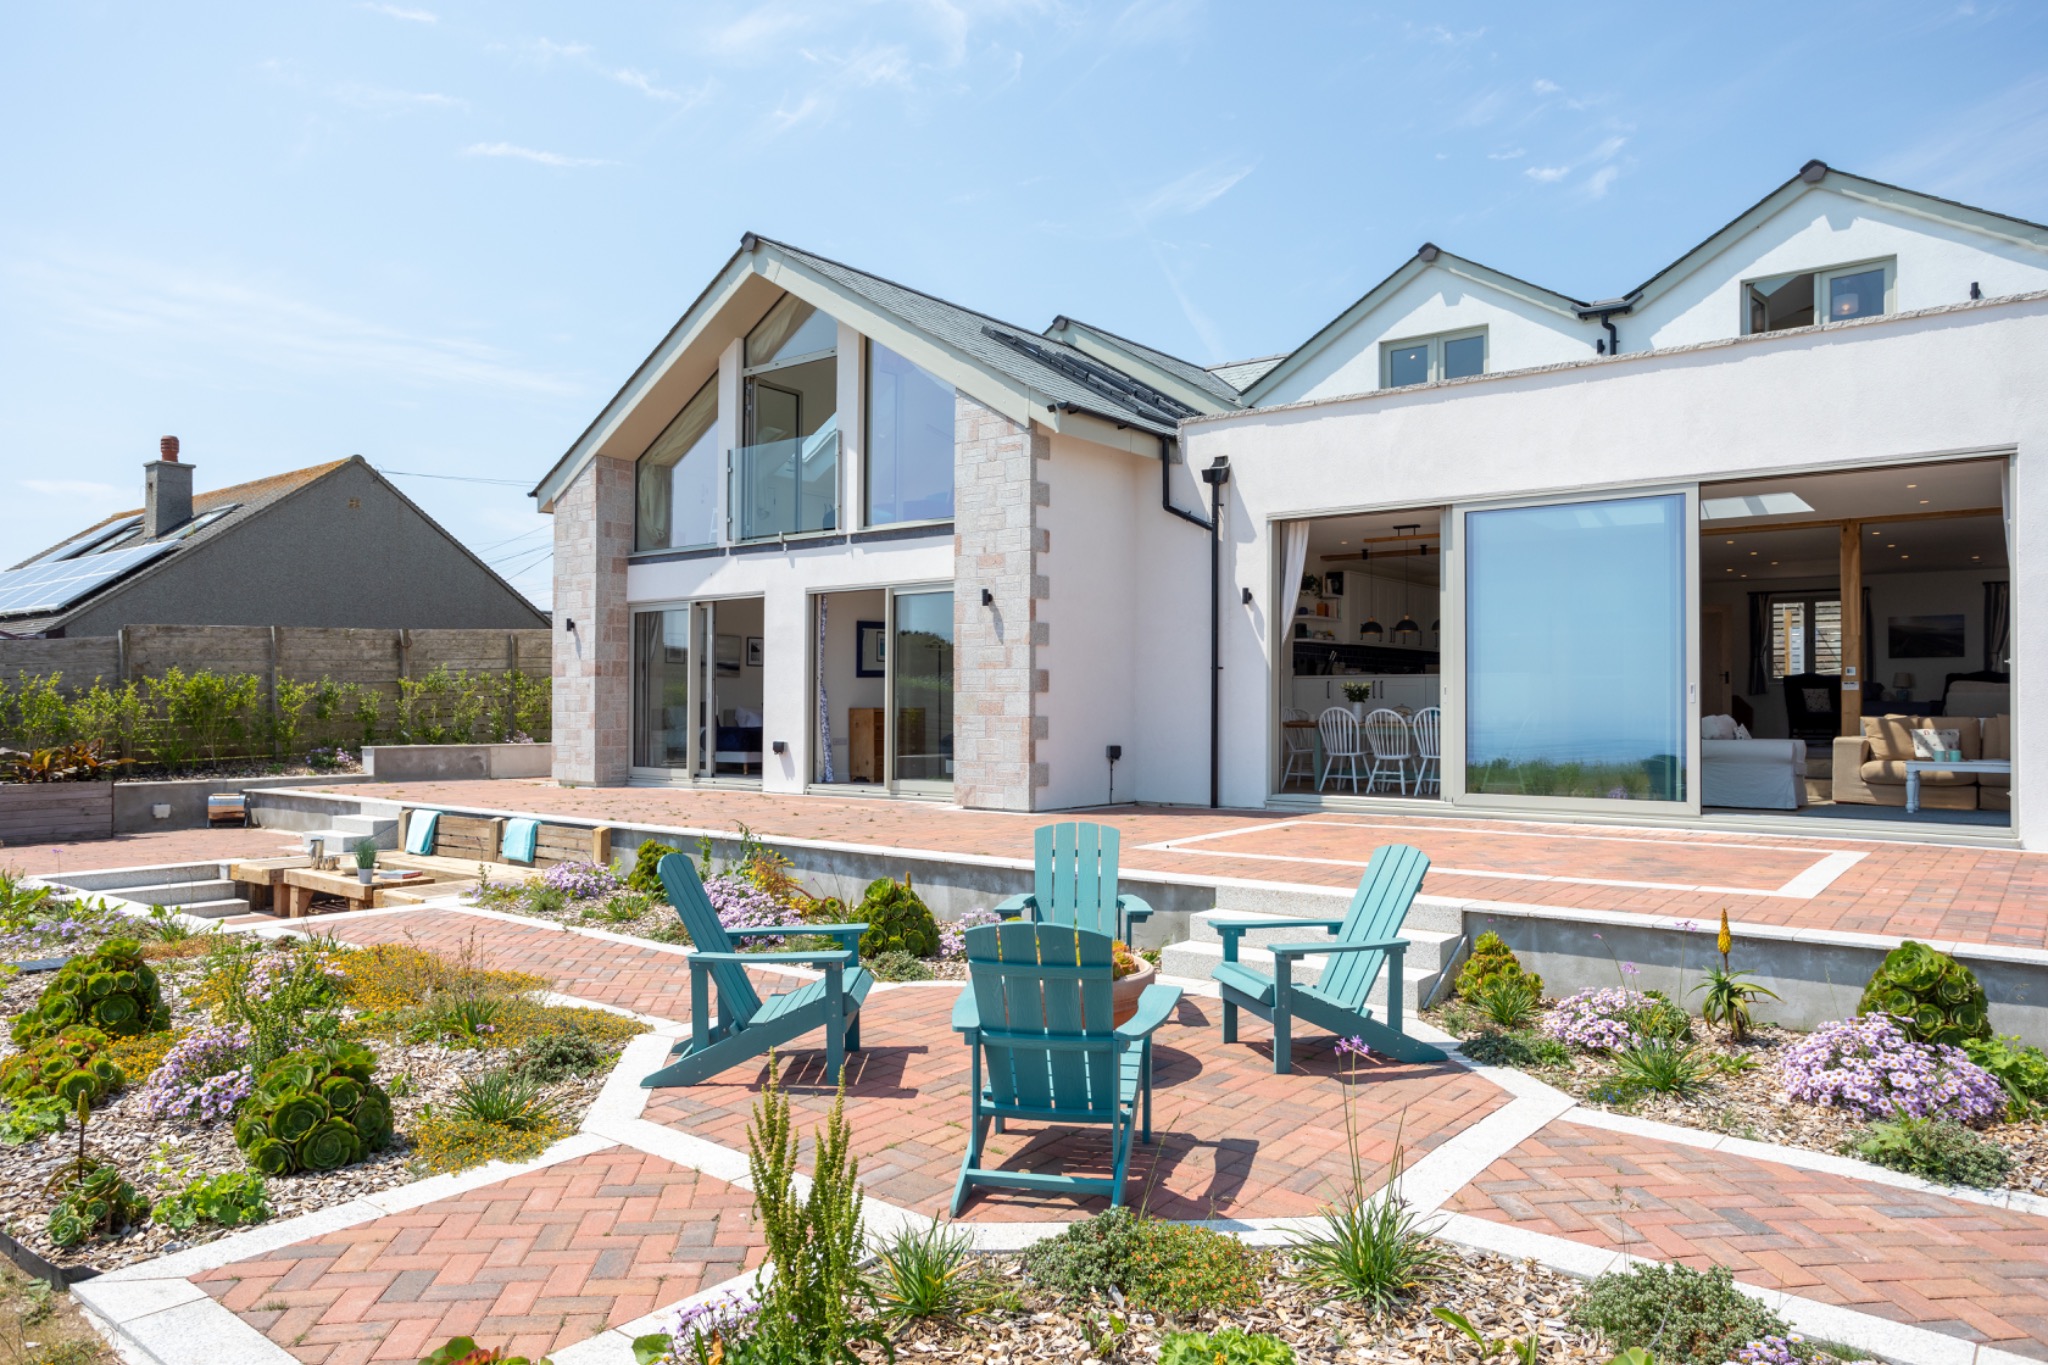
Garden & Exterior
The outside is just as important as the inside, especially as all my packages include drone photography. This is the hero shot that will grab attention online.
- Landscaping: Lawns should be freshly mown, flower beds weeded, and patios swept. Add a few pots with colourful flowers to brighten things up.
- Hide the Bins: Ensure all council bins and recycling boxes are moved completely out of sight.
- Parking: On the day of the shoot, make sure there are no cars parked directly in front of the house, unless it’s a high-end car that adds to the aspirational feel. We want a clear, unobstructed view of the property.
04Lighting: The New Build Challenge
New builds often present a specific lighting challenge: an over-reliance on harsh, overhead LED downlights. While practical, they can create unflattering shadows and a sterile atmosphere in photos. This is where staging can help enormously. By strategically placing floor lamps and table lamps, you introduce warmer, lower-level light sources that create depth and a much more inviting mood. I can then balance this with my own lighting to create a final image that feels bright, airy, and full of character.
05Common Staging Mistakes (That Look Fine in Person)
- Too Many Small Knick-Knacks: They just look like clutter on camera.
- Rugs That Are Too Small: A small rug can make a room look smaller. The rug should be large enough for at least the front legs of the main furniture to sit on it.
- Personal Photos: These make it harder for buyers to imagine themselves living there.
- Visible Wires and Cables: A nest of wires under a desk or behind a TV is a major distraction. Tidy them up or hide them.
06The Pre-Shoot Checklist
To make sure everything runs smoothly, a little planning goes a long way. Here’s a simple checklist to work through with your team.
| Task | Who's Responsible | When |
|---|---|---|
| Final 'sparkle' clean of the property | Cleaning Team / Site | Day before or morning of |
| Confirm access details with photographer | Site Manager | 2-3 days before shoot |
| Final staging check and tweaks | Stager / Designer | Day before shoot |
| Ensure heating is on (if cold) | Site Manager | Morning of shoot |
| Move all bins and vehicles | Site Manager | Morning of shoot |
| Mow lawns and tidy garden | Landscaping / Site | 1-2 days before shoot |
| Ensure all lightbulbs are working | Site Manager | Week before shoot |
07The Day of the Shoot
On the day itself, my job is to capture the property at its absolute best. The developer’s main role is to ensure I have unimpeded access and the property is presented as planned. The heating should be on in colder months to avoid any visible breath in the photos and to make the home feel welcoming. A final check for any last-minute dust or smudges is always a good idea. Once I’m set up, you can leave me to it! I’ll work through the property methodically, styling and shooting each room to create a compelling visual story.
08A Note on the Weather
We live in the UK, so we have to talk about the weather! For exterior and drone shots, we are somewhat at the mercy of the elements. While I can shoot in most conditions, heavy rain or very high winds can be a problem. We’ll always have a contingency plan. This might mean scheduling a separate, shorter visit to capture the exteriors when the weather is better, or focusing on the interior shots first and hoping for a break in the clouds. Flexibility is key.
Ultimately, a successful show home shoot is a team effort. By thinking like a photographer and planning your staging with the camera’s eye in mind, you give your properties the very best chance to shine. You create marketing assets that not only look beautiful but work hard to attract the right buyers and achieve the best possible price.
If you’re a developer in Somerset, Bristol, or Bath and want to make sure your next show home gets the photography it deserves, I’d love to chat. You can learn more about my services for new build developers or get in touch.
Related Reading: For more insights, check out my posts on New Build Property Photography for Developers in Somerset and why professional photography is a must-have for new build developments.
I work with developers across the South West on show homes and new builds. View my property photography for developers in Bristol, Bath & Somerset or contact me to discuss your development.
--- I photograph new builds and show homes across the South West and UK-wide. Get in touch or call 07545 450543 to discuss your development.